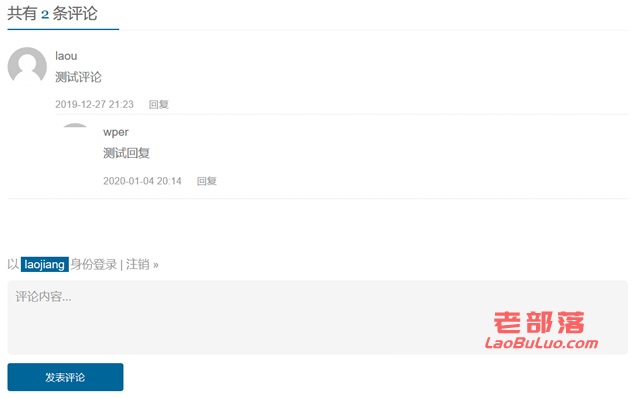
一般我们制作或者仿WordPress主题的时候,评论模块是相对比较复杂的,但是一般我们只要拆解几个常见的评论模块且修改样式套用到我们的主题模板中就可以快速实现需要的评论效果,一般自用是没有多大问题的。如果我们准备商业化,还需要进行优化和修改以及样式的本地化设置。
在这篇文章中,笔者有在尝试制作一款WordPress主题,在评论模块的时候需要快速实现一个WordPress评论功能,这里我直接采用Simple主题的评论样式简单修改实现。这里我就把具体的实现方法记录下来,这样后面我们有需要用到评论模块基本可以通用实现。
第一、评论模板页面
这里我们需要在comments.php评论模板页面放下代码:
<?php
// Edit By laobuluo.com
if ( post_password_required() )
return;
?>
<div id="comments" class="responsesWrapper">
<meta content="UserComments:<?php echo number_format_i18n( get_comments_number() );?>" itemprop="interactionCount">
<h3 class="comments-title">共有 <span class="commentCount"><?php echo number_format_i18n( get_comments_number() );?></span> 条评论</h3>
<ol class="commentlist">
<?php
wp_list_comments( array(
'style' => 'ol',
'short_ping' => true,
'avatar_size' => 48,
'type' =>'comment',
'callback' =>'simple_comment',
) );
?>
</ol>
<nav class="navigation comment-navigation u-textAlignCenter" data-fuck="<?php the_ID();?>">
<?php paginate_comments_links(array('prev_next'=>true)); ?>
</nav>
<?php if(comments_open()) : ?>
<div id="respond" class="respond" role="form">
<h2 id="reply-title" class="comments-title"><?php comment_form_title( '', '回复给 %s' ); ?> <small>
<?php cancel_comment_reply_link(); ?>
</small></h2>
<?php if ( get_option('comment_registration') && !$user_ID ) : ?>
<p>You must be <a href="<?php echo get_option('siteurl'); ?>/wp-login.php?redirect_to=<?php echo urlencode(get_permalink()); ?>">logged in</a> to post a comment.</p>
<?php else : ?>
<form action="<?php echo get_option('siteurl'); ?>/wp-comments-post.php" method="post" class="commentform" id="commentform">
<?php if ( $user_ID ) : ?>
<p class="warning-text" style="margin-bottom:10px">以<a href="<?php echo get_option('siteurl'); ?>/wp-admin/profile.php"><?php echo $user_identity; ?></a>身份登录 | <a class="link-logout" href="<?php echo wp_logout_url(get_permalink()); ?>">注销 »</a></p>
<textarea class="form-control" rows="3" id="comment" onkeydown="if(event.ctrlKey&&event.keyCode==13){document.getElementById('submit').click();return false};" placeholder="评论内容..." class="form-control" tabindex="1" name="comment"></textarea>
<?php else : ?>
<textarea class="form-control" rows="3" id="comment" onkeydown="if(event.ctrlKey&&event.keyCode==13){document.getElementById('submit').click();return false};" placeholder="评论内容..." tabindex="1" name="comment"></textarea>
<div class="commentform-info">
<label id="author_name" for="author">
<input class="form-control" id="author" type="text" tabindex="2" value="<?php echo $comment_author; ?>" name="author" placeholder="昵称[必填]" required>
</label>
<label id="author_email" for="email">
<input class="form-control" id="email" type="text" tabindex="3" value="<?php echo $comment_author_email; ?>" name="email" placeholder="邮箱[必填]" required>
</label>
<label id="author_website" for="url">
<input class="form-control" id="url" type="text" tabindex="4" value="<?php echo $comment_author_url; ?>" name="url" placeholder="网址(可不填)">
</label>
</div>
<?php endif; ?>
<div class="btn-group commentBtn" role="group">
<input name="submit" type="submit" id="submit" class="btn btn-sm btn-danger btn-block" tabindex="5" value="发表评论" /></div>
<?php comment_id_fields(); ?>
</form>
<?php endif; ?>
</div>
<?php endif; ?>
</div>
这里我们将代码丢到评论模板页面中。
第二、自定义评论函数
在当前主题的Functions.php页面中加入自定义评论函数:
//自定义评论列表模板 Edit By laobuluo.com
function simple_comment($comment, $args, $depth) {
$GLOBALS['comment'] = $comment; ?>
<li class="comment" id="li-comment-<?php comment_ID(); ?>">
<div class="media">
<div class="media-left">
<?php if (function_exists('get_avatar') && get_option('show_avatars')) { echo get_avatar($comment, 48); } ?>
</div>
<div class="media-body">
<?php printf(__('<p class="author_name">%s</p>'), get_comment_author_link()); ?>
<?php if ($comment->comment_approved == '0') : ?>
<em>评论等待审核...</em><br />
<?php endif; ?>
<?php comment_text(); ?>
</div>
</div>
<div class="comment-metadata">
<span class="comment-pub-time">
<?php echo get_comment_time('Y-m-d H:i'); ?>
</span>
<span class="comment-btn-reply">
<i class="fa fa-reply"></i> <?php comment_reply_link(array_merge( $args, array('reply_text' => '回复','depth' => $depth, 'max_depth' => $args['max_depth']))) ?>
</span>
</div>

<?php
}
?>
第三、评论CSS样式
#comments{padding-bottom:30px;line-height:1}
.comments-title{position:relative;padding-bottom:10px;font-size:18px;color:#666;border-bottom:1px solid #f1f1f1}
h3.comments-title:after{position:absolute;content:'';top:29px;left:0;width:135px;height:1px;background:#069}
.commentCount{color:#069}
.commentlist{list-style:none;margin:10px 0 0;padding:0}
.commentlist ol{list-style:none}
.comment{padding:10px 0 5px}
.comment .media-left{display:table-cell;vertical-align:top;padding-right:10px}
.comment .media-left img{border-radius:50%}
.comment .media-body{display:table-cell;vertical-align:top}
.comment .media-body .author_name{margin-bottom:5px;font-size:14px;color:#777}
.comment .media-body p{font-size:14px;line-height:1.5em;color:#777}
.comment .media-body p a{color:#000}
.comment .comment-metadata{margin-left:58px;padding:5px 0}
.comment .comment-metadata span{margin-right:15px;font-size:13px}
.comment .comment-metadata span{font-size:12px;color:#999}
.comment .comment-metadata span.comment-btn-reply a:hover{color:#666}
.comment .comment-metadata span.comment-btn-reply i{color:#d1d1d1}
.comment .comment-metadata span.comment-btn-reply a{color:#999}
.commentlist>.comment{border-bottom:1px dotted #d9d9d9}
.commentlist .children{padding-left:58px}
.commentlist .children>.comment{border-top:1px dotted #d9d9d9}
#reply-title{font-size:14px;color:#666;border-bottom:0;color:#999}
#reply-title a:first-child,.warning-text a:first-child{display:inline-block;margin:0 2px;padding:2px 5px;background:#069;color:#fff;font-size:14px}
#reply-title #cancel-comment-reply-link{background:#fff;color:#999}
#reply-title #cancel-comment-reply-link:hover{text-decoration:underline}
.warning-text{color:#999}
.link-logout{color:#999}
.comment-navigation{width:100%;margin:0 auto;padding:15px 0;text-align:center}
.comment-navigation .page-numbers{display:inline-block;padding:9px 16px;color:#999;background:#f1f1f1}
.comment-navigation .page-numbers:hover{background:#e8e8e8;color:#666}
.comment-navigation .current,.comment-navigation .current:hover{background:#069;color:#fff}
textarea#comment{display:block;width:100%;margin-bottom:10px;background:#f5f5f5;color:#777;border:0;box-shadow:none;height:90px;padding:10px;resize:none;border-radius:5px;transition:background .3s}
textarea#comment:focus{background:#e9e9e9}
.commentform-info{float:left}
.commentform-info input{margin-right:10px;width:230px;border:0;border-radius:0;box-shadow:none;background:#f5f5f5;font-weight:400;transition:background .5s}
.commentform-info input:focus{box-shadow:none;color:#fff!important;background:#069}
.commentform-info input:focus:-moz-input-placeholder{color:#fff}
.commentform-info input:focus::-moz-input-placeholder{color:#fff}
.commentform-info input:focus::-webkit-input-placeholder{color:#fff}
.commentform-info input:focus:-ms-input-placeholder{color:#fff}
.commentBtn .btn{padding:8px 0;width:140px!important;text-align:center;background:#069;border:0}
.commentBtn .btn:hover{opacity:.8}
input#submit{color:#fff}
这是我们评论样式CSS。最后我们看一下效果。

我们可以看到这个评论样式还是可以通用的。只需要将上面的基础代码对应丢到对应页面即可实现,如果我们自己需要自定义可以直接修改样式。

 老部落
老部落


